Getting started
Quick start
One checklist from buying the Charity kit to your first donation and your first volunteer sign-up, with a link to the chapter for every step.
On this page
This checklist takes you from buying the kit to a working charity website: a live campaign with a donate button, and a volunteer form that sends sign-ups to you. Work through it in order. Each step links to the chapter with the full detail. Most charities get through it in an afternoon.
Features marked (Pro) need a Pro or Agency licence.
1. Buy and install
- Buy the kit and find your licence key in the receipt email. See Buying and your licence.
- Check your hosting and make a backup. See Before you install.
- Install, in this order: Gradespace Core, then the Gradespace Charity plugin (a plugin is an add-on for WordPress), then the Gradespace Charity theme. See Installing.
- Add your licence key under Settings → Gradespace licence and click Activate. This switches on updates and, with Pro, shifts, calendar feeds, routing and campaign update emails.
2. Run the setup wizard
- The wizard opens by itself after installing. If it doesn't, click Continue setup on the Dashboard.
- It asks for your charity's registration details, your donation page and how volunteering works. It can also add the starter pages (Home, Campaigns, Donate, Get help, Volunteer, My shifts, Events, Stories, Annual report, About and Contact) and the main menu.
- See The Charity setup wizard for each question. You can run it again later.
3. Your details and your look
- Go to Charity → Settings → Your charity and check your regulator, your registered charity number and your trustees. These appear in every footer. See Settings reference.
- On the Business tab, add your logo and, if you're a company, the registered name and company number.
- On the Contact tab, add your phone number, public email and address.
- Choose a design and colour palette under Site Settings → Design & colours. See Designs, pages and menus and Your look.
4. Connect your donation provider
- Go to Charity → Settings → Donations.
- Choose your Provider (for example JustGiving) and paste Your donation page. It must start with https:// and be on the provider's own website.
- Set the Amounts to offer and, if your provider takes regular gifts, tick Offer monthly giving.
- Click Save changes.
- Full detail, including Gift Aid and embedded forms: Donations, Gift Aid and supporters.
5. Add your first campaign
- Go to Charity → Campaigns → Add campaign.
- Write the title and the story, and add a featured image.
- In Target and total, set the Target (£). Leave Raised so far (£) empty until you have a figure.
- Tick Feature it in the appeal banner if it's your main appeal this month.
- Click Publish.
- See Campaigns and appeals.
6. Your places and volunteer roles
- Under Charity → Places, add each hall, shop, hub or food bank, with its address, opening times and the Coordinator's email. See Places and services.
- Under Charity → Volunteer roles, add the jobs volunteers can do, with the time each takes and any checks. See Volunteers and roles.
- With Pro, add a few shifts under Charity → Shifts → Add shift. See Shifts, the rota and My shifts.
- Under Charity → Settings → Email, check Send notifications to: new volunteer sign-ups are emailed there.
7. Test it: your first donation and your first volunteer
- Sign out (or open a private browser window) and visit your website.
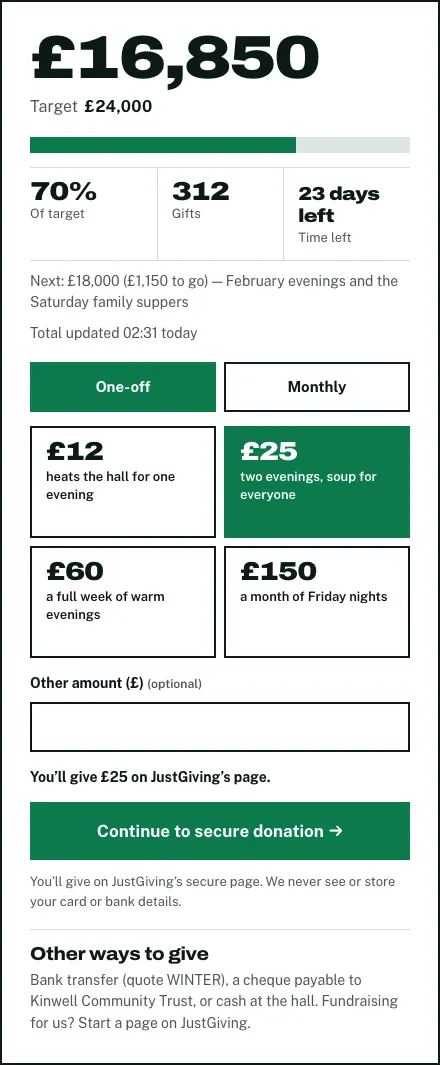
- A donation: open your campaign, choose an amount and click Continue to secure donation. Check that your provider's own page opens with the amount filled in (where the provider allows it). You can make a small real gift to check that it reaches your provider's dashboard.
- A volunteer: open the Volunteer page, choose a role, fill in your details, tick the two boxes at the bottom and click Send my sign-up. You should get the automatic reply by email, and the sign-up should appear under Charity → Volunteers as New and on Charity → Today.
- Remove your test sign-up afterwards: an administrator can use Tools → Erase Personal Data with the email address you used (see Volunteers and roles). Or simply set its status to Left.
8. Your daily routine
Sign in each morning and start at Charity → Today. See Running the website day to day.